

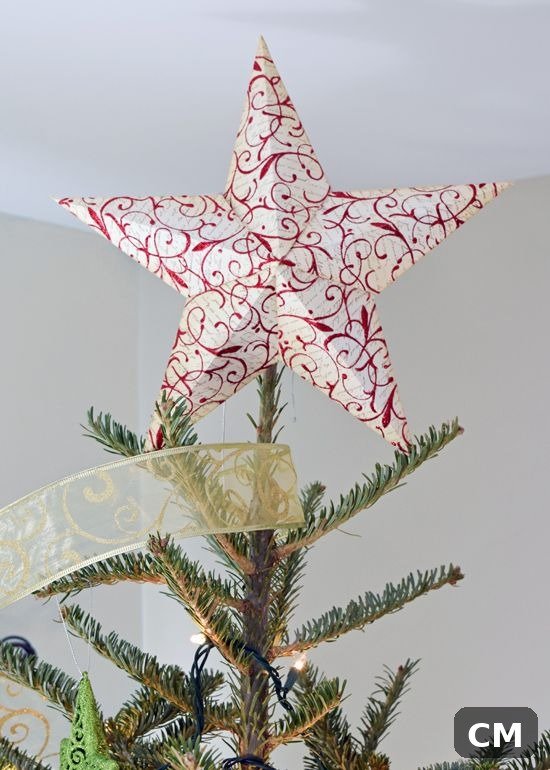
Every December the same thing happens: the tree is up, the ornaments are hung, the lights are twinkling — and the very top of the tree looks unfinished. Store-bought toppers can cost a small fortune and rarely match your decor, but a handmade topper takes an afternoon, costs almost nothing, and becomes the piece guests actually ask about.
Making your own Christmas tree topper is one of the most satisfying holiday crafts because it sits at the crown of everything — literally the finishing touch on weeks of decorating. Whether your style is classic and elegant, rustic and natural, or gloriously over-the-top, there is a project here that fits your skill level and the supplies you already own.
Below are 20 Christmas tree topper ideas organized as hands-on projects, from thirty-minute paper crafts to weekend builds with wire and lights. Each idea lists the materials you need, the basic steps, and an honest difficulty rating, so you can choose a project that matches your time, your tools, and your patience.
Paper Projects (Beginner — Under 30 Minutes)
Paper is the friendliest craft material on this list: cheap, forgiving, and surprisingly elegant when finished well. All you need is cardstock, scissors, and glue. Difficulty: Very Easy.
1. Layered Cardstock Star
Materials: gold or silver cardstock, craft glue, glitter, and ribbon. Steps: cut two identical five-pointed stars, glue a narrow strip of card around the edges to create a 3D shape, decorate with glitter, and attach a ribbon loop to the back for mounting. Difficulty: Very Easy. This classic takes under an hour and looks far more expensive than the few dollars of materials it uses.
2. Origami Book-Page Star
Materials: pages from an old book or sheet music, glue, and optional gold paint. Steps: fold the pages into modular origami star units, glue the units into a full star, and brush the edges with gold paint for a vintage finish. Difficulty: Easy. It carries a lovely literary charm on vintage or neutral-themed trees, and repurposing damaged books gives them a second life.
3. Paper Rosette Medallion
Materials: two sheets of decorative paper, a hot glue gun, and a small star sticker or bead for the center. Steps: accordion-fold each sheet into a rosette, glue the two rosettes back to back, and finish with the center embellishment. Difficulty: Very Easy. The layered pleats catch the light beautifully, and you can match the paper to your exact color scheme.
4. Quilled Paper Snowflake
Materials: quilling paper strips (or hand-cut strips), craft glue, and tweezers. Steps: roll tight coils and teardrop shapes, glue them into a symmetrical six-pointed snowflake, and reinforce the center with a small circle of cardstock. Difficulty: Easy to Moderate — the rolling is meditative once you get the rhythm, and the finished snowflake looks like delicate icework.
Fabric and Felt Makes (Beginner — No Sewing Machine Needed)
Fabric toppers add softness and texture that store-bought plastic can never match. Felt is the star here: it does not fray, it is easy to cut, and hand-stitching is optional. Difficulty: Easy.
5. Felt Star with Blanket Stitch
Materials: two felt star shapes, embroidery thread, stuffing or cotton balls, and a ribbon loop. Steps: blanket-stitch the two stars together around the edges, leaving a gap to add a little stuffing, then close and attach the ribbon. Difficulty: Easy. The visible stitching is the whole point — it gives a cozy, handmade look that suits farmhouse and Scandinavian trees perfectly.
6. Giant Ribbon Bow Topper
Materials: wide wired ribbon in your chosen colors, floral wire, and scissors. Steps: form four to six loops, pinch the centers together, secure tightly with floral wire, fluff the loops, and leave long tails to cascade down the tree. Difficulty: Easy. A big bow reads as playful and luxurious at once, and wired ribbon holds its shape all season without wilting.
7. Scrap-Fabric Angel
Materials: fabric scraps, a wooden bead for the head, a pipe cleaner for the halo, and glue. Steps: gather a fabric circle into a cone for the dress, glue the bead on top, add folded fabric wings at the back, and twist the pipe cleaner into a halo. Difficulty: Easy. This is a wonderful project for using leftover fabric from other sewing, and each angel comes out charmingly unique.
8. Pom-Pom Cluster Topper
Materials: yarn in two or three colors, a pom-pom maker or cardboard discs, and a small cone or dowel base. Steps: make six to eight fluffy pom-poms, tie them tightly, and glue them in a cluster around the base so they form a rounded crown. Difficulty: Easy. It is joyful, kid-friendly to make, and perfect for a colorful, playful tree — plus it weighs almost nothing.
Rustic Nature Builds (Easy to Moderate)
If your tree leans farmhouse, woodland, or cabin-style, these nature-based toppers will look like they were always meant to be there. Most materials can be gathered on a walk. Difficulty: Easy to Moderate.
9. Twig Star Bound with Twine
Materials: five straight twigs of similar length, garden twine, and optional fairy lights. Steps: arrange the twigs into a five-pointed star, lash each joint tightly with twine, trim the ends, and weave in battery fairy lights if you like. Difficulty: Easy. The raw, organic look is stunning against green branches, and wrapping it in warm micro-lights makes it glow after dark.
10. Pinecone Cluster Crown
Materials: five to seven pinecones, a small grapevine wreath or wire ring as a base, hot glue, and gold spray paint (optional). Steps: glue the pinecones upright around the base in a crown formation, let dry fully, and mist lightly with gold paint for a frosted effect. Difficulty: Easy. It reverses the usual topper hierarchy in the best way — instead of one object, you get a little sculptural arrangement.
11. Dried Orange and Cinnamon Bundle
Materials: dried orange slices, cinnamon sticks, a few sprigs of dried eucalyptus, and twine. Steps: fan the orange slices into a starburst, bind the cinnamon sticks at the center with twine, tuck in the eucalyptus, and wire the whole bundle to the treetop. Difficulty: Very Easy. It smells like Christmas itself, costs pennies, and suits minimalist and natural trees beautifully.
12. Burlap Star
Materials: burlap fabric, cardboard for structure, jute twine, and hot glue. Steps: cut two burlap stars slightly larger than a cardboard star, glue the burlap over both sides of the cardboard, and wrap the edges with twine for a finished look. Difficulty: Easy. The coarse texture adds wonderful contrast on trees heavy with shiny ornaments, and it is sturdy enough to reuse for years.
Wire and Light Crafts (Moderate — The Showstoppers)
These projects take a little more skill and time, but they produce the toppers that make people stop and stare. Battery-powered lights keep everything safe. Difficulty: Moderate.
13. Fairy-Light Wire Star
Materials: sturdy craft wire, pliers, a string of battery-operated micro fairy lights, and floral tape. Steps: bend the wire into a large five-pointed star frame, wrap the light string evenly around the frame, secure the battery pack behind the star with floral tape, and mount on the treetop. Difficulty: Moderate. A glowing star is the single most magical thing you can put on a tree, and the wire frame is lighter than it looks.
14. Copper Wire Snowflake
Materials: copper craft wire in two gauges, pliers, and small crystal or glass beads. Steps: form six spokes from the heavier wire, weave the lighter wire between them in a snowflake pattern, and thread beads onto the spokes as you go. Difficulty: Moderate. The copper catches both daylight and tree lights with a warm metallic glow that suits modern and glam trees alike.
15. Geometric Straw Star (Himmeli)
Materials: natural drinking straws or reed, strong thread, and a needle. Steps: cut straws to equal lengths, thread them into triangles, and join the triangles into a three-dimensional geometric star following a simple himmeli pattern. Difficulty: Moderate. This Finnish tradition produces an airy, architectural topper that looks incredible on minimalist Scandinavian-style trees.
16. Vintage Cookie-Cutter Star
Materials: a large vintage-style metal star cookie cutter, ribbon, and optional sprigs of greenery. Steps: thread ribbon through the cutter, tie it into a hanging loop with a bow, tuck in a small sprig of faux greenery or berries, and perch it on the treetop. Difficulty: Very Easy. It is technically the simplest project here, but the nostalgic charm is enormous — especially on a kitchen or baking-themed tree.
Keepsake and Novelty Toppers (Fun Weekend Projects)
These are the conversation starters: personal, playful, and full of meaning. They take a little imagination but no advanced skills. Difficulty: Easy to Moderate.
17. Family Monogram Letter
Materials: a wooden or papier-mâché letter (your family initial), acrylic paint, glitter or metallic leaf, and a dowel for mounting. Steps: paint the letter in your tree’s accent color, add glitter or gold leaf while the paint is tacky, glue it to a short dowel, and push the dowel into the treetop branches. Difficulty: Easy. It turns the tree into something unmistakably yours, and repainting it each year in new colors can become a family tradition.
18. Mini Santa Hat Topper
Materials: red felt, white faux fur trim, a white pom-pom, and stuffing. Steps: cut and sew or glue a cone from the felt, attach the fur trim around the base, top with the pom-pom, lightly stuff so it holds its shape, and tilt it jauntily on the treetop. Difficulty: Easy. It is pure whimsy — ideal for a children’s tree or anyone whose holiday style leans fun rather than formal.
19. Photo Memory Frame Topper
Materials: a lightweight photo frame or star-shaped frame, a favorite family photo, ribbon, and small ornaments. Steps: place the photo in the frame, decorate the frame edges with ribbon and mini baubles, and mount it facing outward at the top of the tree. Difficulty: Easy. Featuring a wedding photo, a new baby, or a beloved pet makes the tree deeply personal — just keep the frame light so it sits securely.
20. Ornament Bouquet Pick
Materials: three to five small shatterproof baubles, floral picks or wooden skewers, ribbon, and hot glue. Steps: glue each bauble to a pick, gather the picks into a bouquet, wrap the stems with ribbon, and fan them out at the treetop like a floral arrangement. Difficulty: Very Easy. This is the perfect last-minute rescue when you have no topper at all — it uses ornaments you already own and takes fifteen minutes.
Practical Tips for a Topper That Stays Put
Size it to your tree. As a rule of thumb, your topper should be roughly one-tenth of your tree’s height — a 15 to 25cm topper suits most full-size trees, while tabletop trees need something small and light. An oversized topper overwhelms a slim tree, and a tiny one disappears on a grand one.
Secure it properly. The most reliable method is bending the top branch slightly and wiring the topper to it with floral wire or a pipe cleaner — never just balance it. Keep the topper’s weight centered over the trunk, and for heavy designs, add a dowel pushed down into the branches for extra support. If you are using lights in the topper, choose battery-operated LED strings and keep the battery pack tucked behind where it is hidden but accessible.
Think about safety and storage. Keep paper, fabric, and dried-material toppers away from hot incandescent bulbs — LEDs run cool and are the safer choice throughout the tree. When the season ends, store your handmade topper in a rigid box with tissue paper rather than tossing it in with the ornaments; a little care means it will crown your tree for many Christmases to come. For more seasonal lifestyle inspiration, visit Coachella Magazine.
How do I attach a DIY topper so it does not fall over?
Wire it on — never just perch it. Bend the topmost branch into a slight hook, slide or tie your topper’s mount over it, and reinforce with floral wire wrapped around both the branch and the topper base. For heavier designs, glue the topper to a short wooden dowel and push the dowel down into the dense upper branches, which distributes the weight.
What size should my tree topper be?
Aim for about one-tenth of your tree’s total height. On a standard 180cm (6ft) tree, that means a topper of roughly 18 to 25cm. Slim pencil trees suit narrower, vertical designs like a single star or angel, while full, wide trees can carry bolder pieces like a large bow or an ornament bouquet.
Can I put a heavy topper on an artificial tree?
Yes, with support. Artificial trees have sturdy center poles at the top, which actually makes mounting easier — you can wire or clamp heavier toppers directly to the pole. Just keep the weight balanced and centered, and avoid anything so heavy it bends the pole or makes the tree top-heavy and unstable.
What is the easiest topper for a complete beginner?
The ornament bouquet pick and the dried orange bundle are the two fastest wins — both take under twenty minutes, need no special tools, and use materials you probably already have. The layered cardstock star is the best beginner star: simple cutting and gluing with a genuinely impressive result.
How do I keep a handmade topper looking good year after year?
Store it in its own rigid box with tissue paper, away from damp and direct heat. Touch up glitter or paint before each season, check wire joints for loosening, and replace battery packs annually. Paper toppers last longest when kept dry — a light coat of clear craft sealant adds durability without changing the look.
Bottom Line
The top of the tree is the one spot every eye travels to, which is why a handmade topper carries so much more weight than its size suggests. It is not really about the star or the angel or the bow — it is about the afternoon you spent making it, the materials you already had, and the small signature it puts on the whole season. Years from now, when that slightly crooked felt star comes out of its box again, it will not just decorate the tree. It will bring the memory of the day you made it right back with it.
